For those of you who don’t know I am a huge Photoshop Lightroom fan. It is incredibly powerful and very efficient so that I do all my down loading, editing, organizing, processing and printing through Lightroom. And it is incredibly fast. Lightroom is so powerful and effective now that I haven’t used Photoshop in months! (By the way, I am not a paid advocate of Lightroom. I am not a paid advocate of anything. This way I can stay objective)

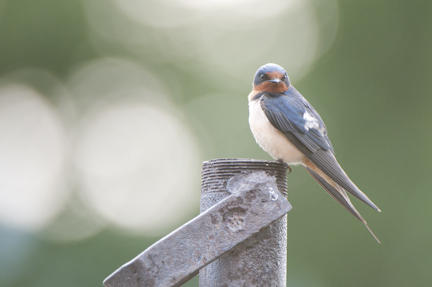
Here is a shot I took the other day at the farm of a barn swallow. I noticed this barn swallow perched on a nice loop of hose in the barn while I was doing chores. I came back with my big lens (Nikon 200-400) little later to get the shot but when I set up I noticed that the better shot was on this old pipe gatepost that was behind me. The only catch was it meant that I was shooting it into the sun. So I did the best I could at the time to minimize any bright spots int he background, shot away and down loaded it into Lightroom

In lightroom the first thing I did was crop it to a vertical. This cut out a lot of the bad background. If I had had time I would’ve shot it as a vertical but my mind said horizontal at first and at second the bird flew away!

The first 3 things I do when I process an image in the Develop module in Lightroom involves correcting the exposure. This image seemed a bit light to me so I darkened the image using the exposure slider. I also put the ‘Tint’ slider to 0. (this is something I always do. Not for any good reason, I just don’t like the computer making this value judgement without including me). I also added a bit of black to the image by sliding the black slider from 5 up to 9. Using just a touch of black will often take some of the haziness/dullness out of an image. (Using both the exposure slider and the black slider in Lightroom is the same as finding the white and black points in Photoshop when in Levels)

The second thing I do to an image in Lightroom is to use the Clarity and Vibrance sliders. (With all the sliders I strongly recommend that you slide them up to the point that you like the result and then back off some. This prevents the image from looking over processed and detracting with the beauty of the shot.) For me, Clarity seems to end up between 30 – 50 and Vibrance between 15-30. Again, I am very judicious about using too much of either so I move the slider just enough and no more.

For most of my images these two sets of adjustments are the only things I do. I do sometimes use one more tool for small, fine tweaks of the image. This is the adjustment brush. With this tool I can go in and selectively adjust just one part of the image. This is the same as making a mask in Photoshop but a heck of a lot easier and quicker. And with the Auto Mask box enabled any changes I make to the background stay where I want them and don’t spill over on to the bird. (Auto mask works by looking for strong edges and confining the changes to those edges.)
Using the brush I selectively darkened the bright areas of the background to try to make them less obvious. Ideally, I prefer not to have to do this by choosing my shooting angle carefully and avoiding distracting highlights.
The last thing I did was slightly bump up the exposure to give the image more life. And that was it. In all it took me less than 2 minutes to do all this processing in Lightroom. Here is my the final image-

Am I finished now? Nope! Now I am going to go back and try it again and do a better job. This image is nice but I know I can do better!
